I’m constantly bewildered by fashion bloggers’ ability to constantly post new content. Of course “pic creds” always seem to go to boyfriends, best friends, siblings, moms. But I’m not gonna lie: the people in my life have a lot more to concern themselves with than my personal blog, and I prefer not distracting them from their daily tasks with my constant need to take pictures.
As a fashion blogger who’s just beginning to start and grow, I understand the importance of releasing a consistent stream of new content to Instagram. By releasing more content, you set yourself up with more opportunities for other users to find your account. However, not having people to take your pictures (or not wanting to ask people to take your pictures) can really slow down this release of new content, especially as a fashion blogger whose main content comes from outfit-of-the-days and other outfit pictures. One of the main reasons I put off starting a blog for so long was my fear that I would not be able to produce enough content.
However, I put on my big girl pants and told myself, “You are a strong independent woman and you don’t need NO ONE to take pictures for you!” And so I did it. Pretty successfully, if I say so myself. Though if you have any doubt on my level of success, below are some examples I took by myself. Judge as you please.
So, yeah. Here I am now. Using the hour breaks between classes to scream “Cheese!” at my phone sitting five feet away in the middle of campus surrounded by classmates and bikers and professors getting mildly annoyed with me. And if that sounds at all appealing to you, you should keep reading.
Equipment
I admit. The majority of my Instagram posts are shot on my phone. I’m not sure how the blogging community feels about this, but if it’s super basic, I will confidently and apologetically defend it until the day I die.
As a college student, I don’t really have the money to buy a nice camera nor the time to deal with memory cards and transferring pictures from camera to laptop and fancy editing software and all the other things related to using a camera. I do, however, have fifteen minutes before class to edit a picture on my phone I took earlier that morning.
I use a Samsung Galaxy S7 to take my pictures. The camera on this phone shoots extremely well in natural lighting, and the quality is definitely enough for quick Instagram posts.

Set-Up
This is literally the best tip of this entire article, and you could literally ignore this rest of this post and you’d be set.
One of the main issues I found in taking my own pictures is figuring out how to stand my phone up. I usually don’t have things with me to lean my phone on, and if I do, I find that my phone doesn’t always stay up. Leaning your phone also causes the picture to be taken looking at an upward angle, which you don’t always want. While I know some bloggers stand there phones in a shallow cup, it’s not always convenient to carry a cup around with you. Instead, I recommend you use a power block, which a lot of us carry with us anyway.
Standing your phone between the two prongs keeps your phone standing completely upright and vertical. Because it’s standing completely vertical, your phone’s center of balance is inline with the power block preventing it from losing balance and tipping. Having your phone vertical also allows your pictures perspective to be straight which I think looks professional and flattering on your body.

Camera Settings
One of the most essential features for taking your own pictures is the basic camera timer. However, Android phones are built with features such as voice control and triple shot which make the process so incredibly easy. Unfortunately, iPhones are not built with these features, however I imagine there are apps that can provide similar features. (If you know of any, leave a comment so I can add them here!)
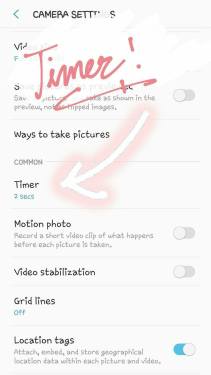
Timer
After opening Android’s basic camera app, you’ll see an icon of a gear in the top right corner, seen below. This button will allow you to access more settings.
Scroll down to the COMMON settings category. This is after the REAR CAMERA settings and FRONT CAMERA settings. The first setting is Timer. It should be set as “off” by default.
Set a timer setting. I typically use 2 secs or 5 secs depending on how I’m feeling that day. Make sure to turn on the “Take 3 shots” setting. This setting causes your camera to take three pictures after the timer runs. It gives you about three seconds between each picture. This is extremely helpful because it gives you time to change poses between shots, however it’s not too much time which causes me to feel stiff and look awkward. It also allows you to take more pictures in less time.


Voice Control
Backing out of this page and scrolling to the bottom of the settings page will take you to the voice control setting.
Yo.
This setting is the best setting of life. It will make you feel silly and ridiculous at first, but the convenience of not having to constantly walk up to your camera to restart the camera timer is a blessing that will make taking your own pictures so much easier. By saying “Cheese”, “Smile”, or “Capture” the camera will take a picture. And if you also have the above camera timer settings on, the voice triggers will start your timer before taking three consecutive shots. So all you have to do is stand in front of your camera, say “Cheese”, and pose three times. You can repeat these as much as you want without even having to approach your camera. Easy-peasy.
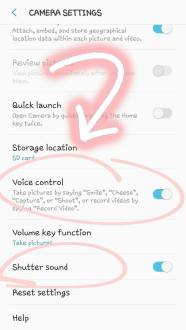
Shutter Sound
I also have the “Shutter sound” turned on. This setting is a necessity for me because when the camera timer is on, it allows you to hear when the timer is running and when the three pictures are being taken. It takes the guess work out of having to know when to change poses. Highly recommend unless you like awkwardly not knowing when to stop posing.
Note: If you have this setting turned on, but you still can’t hear it, make sure your ringtone volume is on!
Location
Okay, I’m not gonna lie. The key to making this work is your location. Having an appropriate location is the only way this can work. Below is a quick checklist:
- Cute background
- Conveniently sized objects that you can put your phone on
- [OPTIONAL] Seclusion (if screaming “Cheese” at your phone in public gives you anxiety)
This checklist may seem short, however it’s actually pretty difficult to find locations that have all of these requirements, mainly the conveniently sized objects. By convenient, I mean something that’s higher than your waist. You’ll find that most things are too short, not large enough for your phone to stand on, or just not flat. Some things I found that worked are planters, trash cans, bookshelves, and bar stools. And no, I do not know what a tripod is.
I highly recommend that you take time to explore your area before shooting. As a college student who has to constantly walk around campus, I make sure to keep my eyes out for future places to shoot, making sure to see if the area has a spot for me to prop my phone that’s about 5 feet from my desired background. Below are some locations I’ve shot at, along with the objects I set my camera on.
When exploring your area, make sure to take test shots. While a location may not look nice, it might actually photograph beautifully, or vice versa.
Some extra notes on location:
- Try to shoot on cloudy days. If not, find somewhere shaded. The lighting will be less harsh.
- Do not shoot during high noon. It will cast too many harsh shadows.
- Use natural light. I rarely shoot indoors, but if I do, it’s by a window.
- Do not shoot anywhere too dark. Most camera phones shoot poorly in low lighting and will result in grainy pictures.
- Walls are cool. You never have to edit people out.
- Again, take test shots before going out for a shoot. It will save you from the trouble of finding out that the object you’re setting your phone on is too low or that the lighting is bad.
Concluding Remarks
I hope you found this tutorial remotely helpful and that it gave you some ideas on how to shoot your own Instagram posts if you ever have a need to. Again, this is something I do for my own convenience, but I strongly believe that you should shoot in whatever way that makes you feel the most comfortable, which I think is a huge part about taking pictures. If you don’t feel comfortable, your pictures will show it, so make sure to do what’s best for you. Again, I hope I was of some help in your journey as an Instagrammer, as a blogger, or as someone who just wants to make memories. Thank you so much for reading.
Love always,
Yana

POWER BLOCK!!!!!!!!!!!!!!!!
LikeLike